

Introduction
This tutorial introduces Apache Kafka, Kafka Producer, and Kafka Consumer, and along the line in the article, we will build two simple applications; One as a producer that produces messages on Kafka topic and the other one as a consumer that consumes messages from the same topic.
First, let’s define some of the key terms.
What is Apache Kafka?
Kafka is a Distributed Event Streaming platform that provides high availability and low end-to-end latency access to data across multiple channels (mobile, web, IoT devices, e.t.c). Kafka works with the publisher-subscriber pattern, where the sender of messages, often called the producer, sends messages to a topic, and all the subscribers immediately receive the messages. In Kafka, we can have multiple producers producing messages and multiple consumers consuming messages.
In the world today, several millions of devices communicate in real-time. For example, in the world of IoT, signals are sent across different devices in real-time. Kafka provides a platform to send signals in the form of messages from one device (the producer) to a topic in which the other device (consumer) consumes the message, which happens at very low latency. There are several implementations of Kafka and some are listed below -
- To process payments and financial transactions in real-time, such as in stock exchanges, banks, and insurances.
- To track and monitor cars, trucks, fleets, and shipments in real-time, such as in logistics and the automotive industry.
- To continuously capture and analyze sensor data from IoT devices or other equipment, such as in factories and wind parks.
- To collect and immediately react to customer interactions and orders, such as in retail, the hotel and travel industry, and mobile applications.
- To monitor patients in hospital care and predict changes in condition to ensure timely treatment in emergencies.
- To connect, store, and make available data produced by different divisions of a company. To serve as the foundation for data platforms, event-driven architectures, and microservices.
Source: Apache Kafka documentation.
Terminologies
- A Producer is any device or client application capable of producing messages - think of it as an emitter; it could also be an IoT device.
- A Consumer is a device or client application that consumes the messages.
- A message in Kafka is called Record, and records are immutable - records can’t change once created or pushed.
- Messages produced by the producer are stored in a Topic. A topic is similar to a table in a database.
- Topics are partitioned and replicated across brokers, i.e. messages are stored in multiple places on different brokers.
- Each message within a partition gets an incremental id called Offset.
- Each message has a unique identifier across partitions, i.e. a message can be identified by the partition Id and the offset id, e.g. partition-0, offset-1 represents a message in partition number 0 and offset of 1.
- Messages are read in the order in each partition with the offset, i.e. consumer A reads from partition-0 in the natural order of the offset id. It is worth noting that messages are read in parallel by the consumers.
- Each consumer belongs to a particular consumer group and reads messages exclusively from the partitions.
- Broker is similar to a server that contains multiple topics. Each broker is identified with an id.
- A zookeeper orchestrates and manages different brokers in a Kafka cluster.
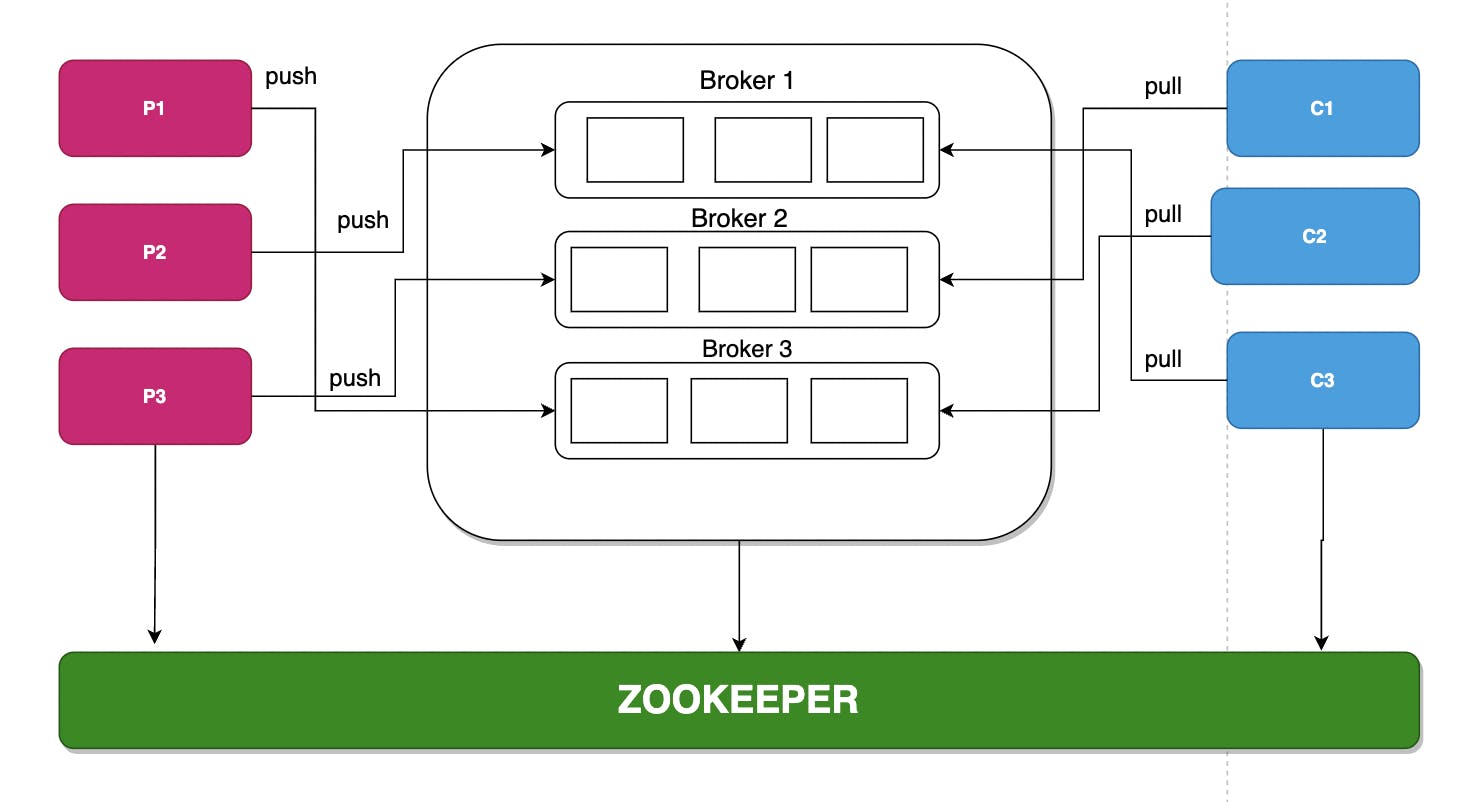 kafka cluster architecture
Prerequisite
In this tutorial, you need to have a general understanding about
- Spring boot
- Docker
Setting up Kafka environment
We will use Docker and docker-compose to set up our Kafka environment and to build the application. You can follow the official documentation on how to install docker here and checkout docker-compose here. You can also clone the docker-compose file used in this tutorial here. After cloning the repo, let’s see what’s inside the docker-compose .yaml file.
version: '3'
services:
  zookeeper:
    image: confluentinc/cp-zookeeper:6.2.1
    hostname: zookeeper
    container_name: zookeeper
    ports:
      - "2181:2181"
    environment:
      ZOOKEEPER_CLIENT_PORT: 2181
      ZOOKEEPER_TICK_TIME: 2000

  broker:
    image: confluentinc/cp-server:6.2.1
    hostname: broker
    container_name: broker
    depends_on:
      - zookeeper
    ports:
      - "9092:9092"
      - "9101:9101"
    environment:
      KAFKA_BROKER_ID: 1
      KAFKA_ZOOKEEPER_CONNECT: 'zookeeper:2181'
      KAFKA_LISTENER_SECURITY_PROTOCOL_MAP: PLAINTEXT:PLAINTEXT,PLAINTEXT_HOST:PLAINTEXT
      KAFKA_ADVERTISED_LISTENERS: PLAINTEXT://broker:29092,PLAINTEXT_HOST://localhost:9092
      KAFKA_METRIC_REPORTERS: io.confluent.metrics.reporter.ConfluentMetricsReporter
      KAFKA_OFFSETS_TOPIC_REPLICATION_FACTOR: 1
      KAFKA_GROUP_INITIAL_REBALANCE_DELAY_MS: 0
      KAFKA_CONFLUENT_LICENSE_TOPIC_REPLICATION_FACTOR: 1
      KAFKA_CONFLUENT_BALANCER_TOPIC_REPLICATION_FACTOR: 1
      KAFKA_TRANSACTION_STATE_LOG_MIN_ISR: 1
      KAFKA_TRANSACTION_STATE_LOG_REPLICATION_FACTOR: 1
      KAFKA_JMX_PORT: 9101
      KAFKA_JMX_HOSTNAME: localhost
      KAFKA_CONFLUENT_SCHEMA_REGISTRY_URL: http://schema-registry:8081
      CONFLUENT_METRICS_REPORTER_BOOTSTRAP_SERVERS: broker:29092
      CONFLUENT_METRICS_REPORTER_TOPIC_REPLICAS: 1
      CONFLUENT_METRICS_ENABLE: 'true'
      CONFLUENT_SUPPORT_CUSTOMER_ID: 'anonymous'
The file defines images for the zookeeper and the broker servers with some default configurations. I will not dive much into docker, only to mention some key components of the file.
zookeeper:
    image: confluentinc/cp-zookeeper:6.2.1
    hostname: zookeeper
    container_name: zookeeper
    ports:
      - "2181:2181"
- image: this defines the image for docker to pull.
- container_name: defines the name given to the container.
- ports: this defines the container port and host port. The container port is the port the container runs on, while the host port is the port to bind to on the host machine.
broker:
    image: confluentinc/cp-server:6.2.1
    hostname: broker
    container_name: broker
    depends_on:
      - zookeeper
    ports:
      - "9092:9092"
      - "9101:9101"
- image: this defines the image for docker to pull.
- container_name: defines the name given to the container.
- ports: this defines the container port and host port. The container port is the port the container is running on, while the host port is the port to bind to on the host machine.
- depends_on: this tells docker that the broker depends on the zookeeper, i.e. zookeeper must run first before the broker.
Creating the Producer Project
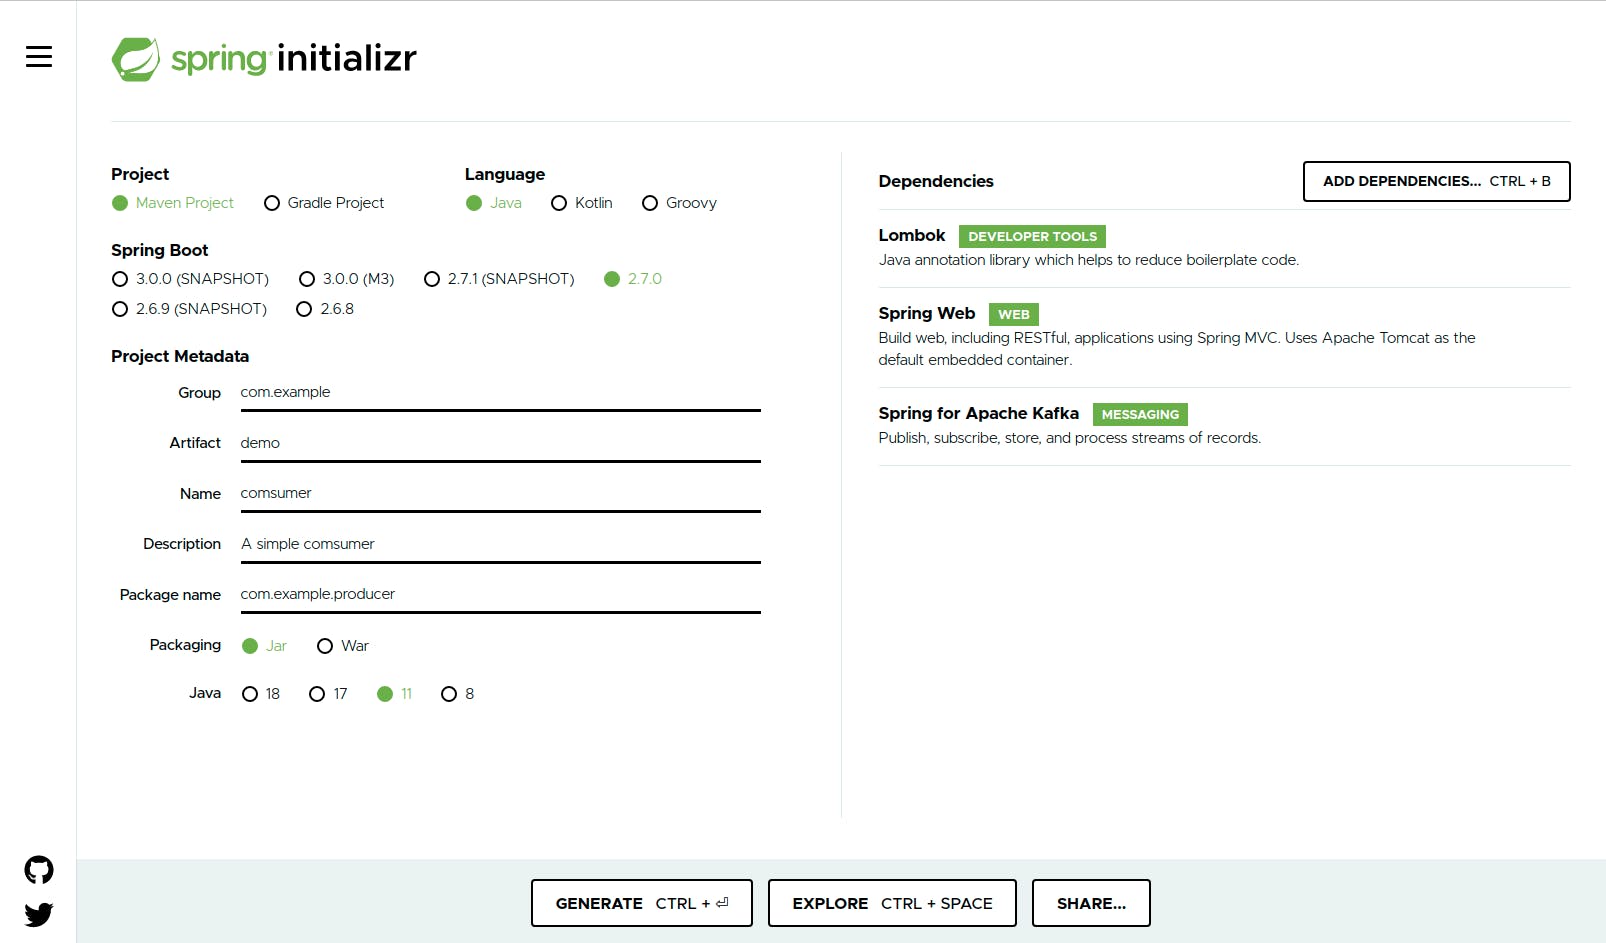
Next, we will create a simple producer project. Let's head on to the spring initializer to create our project.
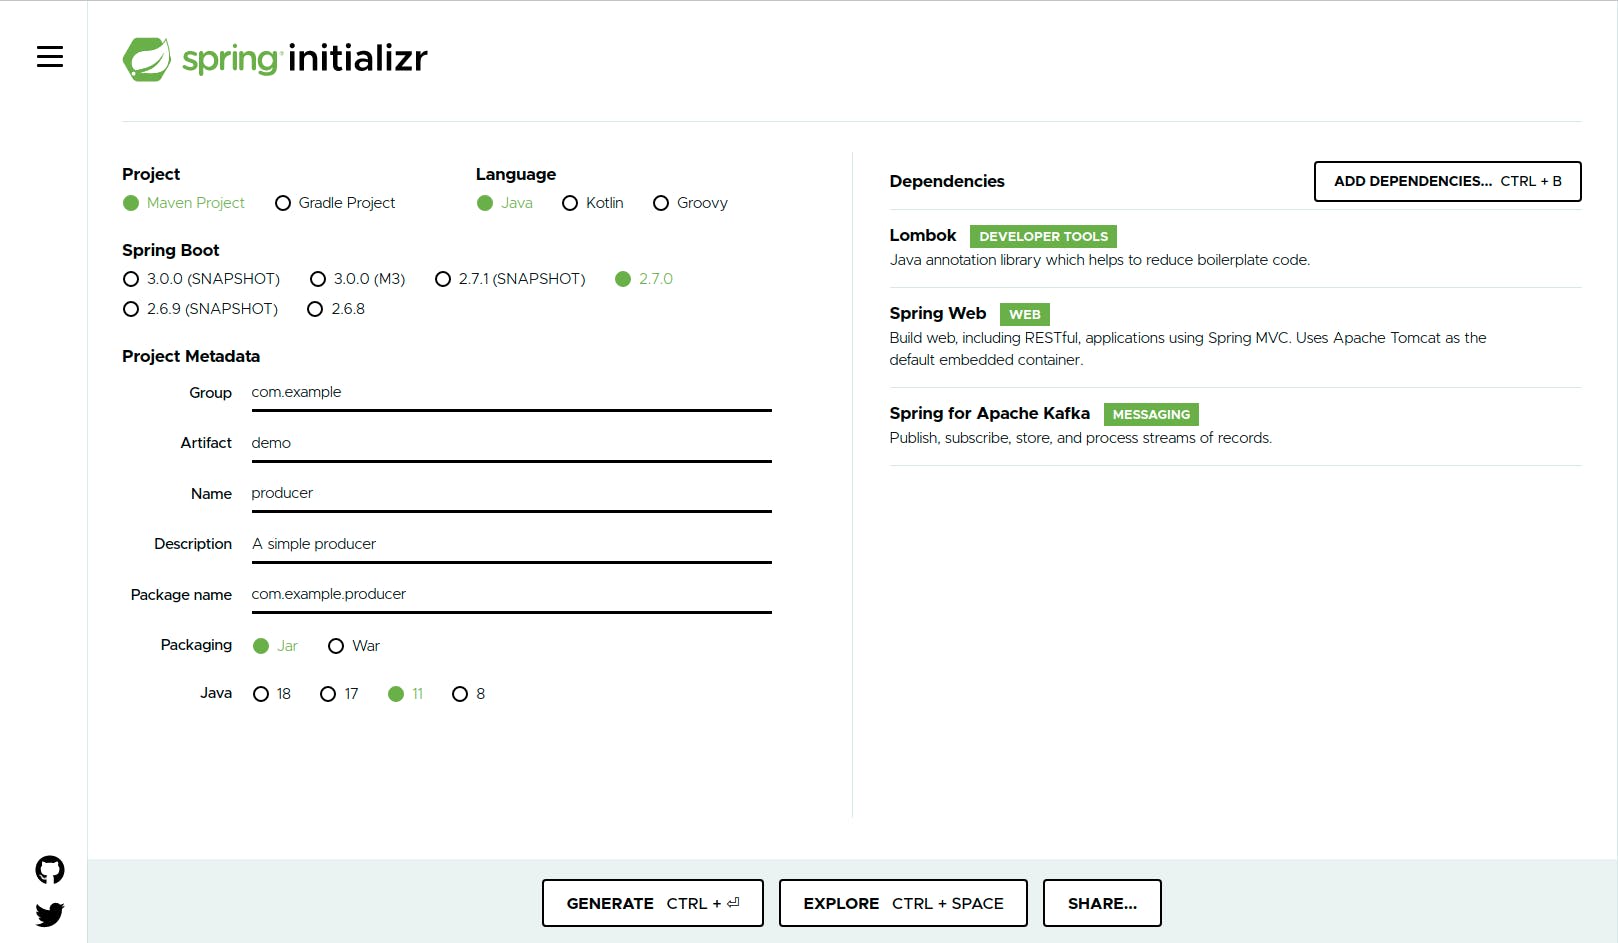
From the metadata part. Set the following;
- Group: leave it as the default “com.example” for the purpose of this tutorial.
- Artifact: demo Name: producer, this should be the project name but for the tutorial, we will leave it as producer.
- Package name: will be auto-generated for us. Packaging: leave it as Jar
- Java: Pick 11, note: you should have this installed on your machine.
Add Lombok, Spring web, and Spring for Apache Kafka on the right pane. After that, click on generate your project, unzip and open on your favorite IDE. If you open the pom.xml file, you should have the following dependencies. a
<dependencies>
   <dependency>
       <groupId>org.springframework.boot</groupId>
       <artifactId>spring-boot-starter-web</artifactId>
   </dependency>
   <dependency>
       <groupId>org.springframework.kafka</groupId>
       <artifactId>spring-kafka</artifactId>
   </dependency>

   <dependency>
       <groupId>org.projectlombok</groupId>
       <artifactId>lombok</artifactId>
       <optional>true</optional>
   </dependency>
   <dependency>
       <groupId>org.springframework.boot</groupId>
       <artifactId>spring-boot-starter-test</artifactId>
       <scope>test</scope>
   </dependency>
   <dependency>
       <groupId>org.springframework.kafka</groupId>
       <artifactId>spring-kafka-test</artifactId>
       <scope>test</scope>
   </dependency>
</dependencies>
Creating Message Object
Now, let’s create the model that we will be pushing to the topic. We will create a java class to denote our message, this will be converted to JSON on transit. We will use Lombok to reduce the boilerplate codes in our class.
src/main/java/com/example/producer/model/Message.java
@Data
@AllArgsConstructor
@NoArgsConstructor
public class Message {
   private String user;
   private String msg;
}
Kafka Producer Configurations
Next, we create our configuration file to define the configuration of the Kafka producer.
src/main/java/com/example/producer/config/KafkaConfig.java
@Configuration
public class KafkaConfig {
   @Value("${kafka.broker}")
   private String brokerServer;

   // create a topic called chat
   @Bean
   public NewTopic chatTopic(){
       return TopicBuilder.name("chat")
               .build();
   }


   @Bean
    public ProducerFactory<String, Message> chatProducerFactory() {
       Map<String, Object> configs = new HashMap<>();
       configs.put(ProducerConfig.BOOTSTRAP_SERVERS_CONFIG , brokerServer);
       configs.put(ProducerConfig.KEY_SERIALIZER_CLASS_CONFIG, StringSerializer.class);
       configs.put(ProducerConfig.VALUE_SERIALIZER_CLASS_CONFIG, JsonSerializer.class);

        return new DefaultKafkaProducerFactory<>(configs);
     }

   @Bean
   public KafkaTemplate<String, Message> chatKafkaTemplate(){
       return new KafkaTemplate<>(chatProducerFactory());
   }
}
Let’s see what we have in the Kafkaconfig.java.
We annotate the class with @Configuration to create a stereotype of configuration in spring.
@Bean
public NewTopic chatTopic(){
    return TopicBuilder.name("chat")
        .build();
}
We name and create our topic using TopicBuilder builder class.
@Bean
 public ProducerFactory<String, Message> chatProducerFactory() {
       Map<String, Object> configs = new HashMap<>();
       configs.put(ProducerConfig.BOOTSTRAP_SERVERS_CONFIG , brokerServer);
       configs.put(ProducerConfig.KEY_SERIALIZER_CLASS_CONFIG, StringSerializer.class);
       configs.put(ProducerConfig.VALUE_SERIALIZER_CLASS_CONFIG, JsonSerializer.class);
       return new DefaultKafkaProducerFactory<>(configs);
   }
The most essential configuration to note here is the broker server, which will be defined in our application.yaml file as kafka.broker: localhost:9092. This specifies the broker server we are connecting to. Next, we specify the KEY_SERIALIZER_CLASS_CONFIG, which defines the serializer for the key. We use StringSerializer.class because our key will be a string. Depending on the use case, you can specify some other class e.g IntegerSerializer for integer key and VALUE_SERIALIZER_CLASS_CONFIG defines the serializer for the value, we are using JsonSerializer.class since we will be passing JSON as our value, other types are possible too based on the use case e.g StringSerializer for string value. We then use the configuration to construct the DefaultKafkaProducerFactory.
src/main/java/com/example/producer/api/ChatController.java
@RestController
@RequestMapping("/api/v1/chats")
public class ChatController {

   @Autowired
   private KafkaTemplate<String, Message> kafkaTemplate;

   @PostMapping("send")
   public ResponseEntity<String> sendMessage(@RequestBody Message message){
       kafkaTemplate.send("chat", UUID.randomUUID().toString(),  message);
       return ResponseEntity.ok("Message sent");
   }
}
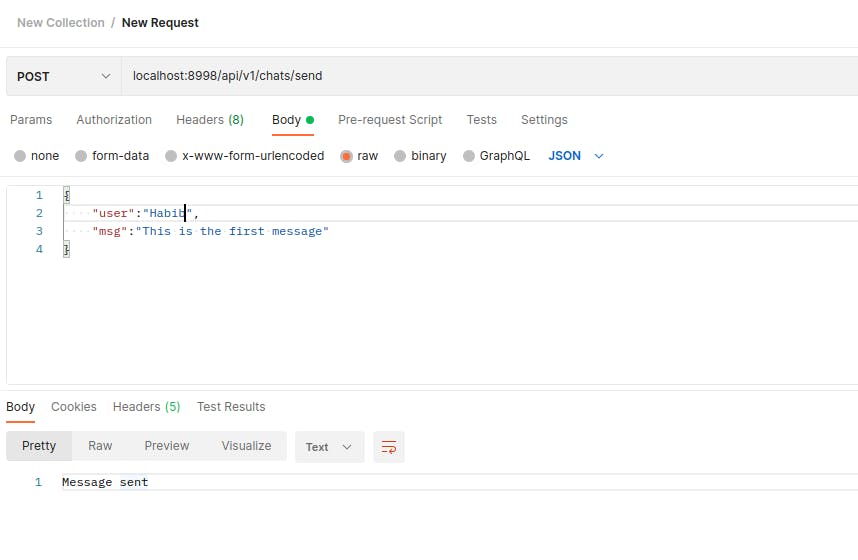
Demo: Pushing message to our topic
Next, we create our controller. Here, we autowire the KafkaTemplate into the class. KafkaTemplate<String, Message> translates to KafkaTemplate <Key, Value>, the Key to mean the class you defined in your serializer and the Value to mean the class you intend to be converted to JSON. We will call the send() method from kafkaTemplate to send the message. There are different implementations of the send() method.
kafkaTemplate.send("chat", UUID.randomUUID().toString(), message); here, the first argument is the topicName, follow by a key(to uniquely identify the message), then the value which is the message object we are sending.KafkaTemplate
We will run the application and paste the URL on postman as the screenshot below.
Setting up Consumer
Now, we are done with our producer. Let us start to create our consumer as we had done for the producer. We head back to spring initializer, we will just change the name of the project to consumer and select the previous configurations.
Create Consumer JSON Object
In other to consume messages from the topic, we will create the same message class that was created in our producer service.
src/main/java/com/example/consumer/model/Message.java
@AllArgsConstructor
@NoArgsConstructor
public class Message {
   private String user;
   private String msg;
}
Kafka Consumer’s Configurations
Next, we move to the consumer configuration
src/main/java/com/example/consumer/config/KafkaConfig.java
@Configuration
public class KafkaConfig {

    @Value("${kafka.broker}")
    private String brokerServer;

    @Bean
    public Map<String, Object> chatProducerFactory() {
        Map<String, Object> configs = new HashMap<>();
        configs.put(ConsumerConfig.BOOTSTRAP_SERVERS_CONFIG, brokerServer);
        configs.put( ConsumerConfig.ENABLE_AUTO_COMMIT_CONFIG, true);
        return configs;
    }

    @Bean
    public ConsumerFactory<String, Message> chatKafkaTemplate(){
        JsonDeserializer<Message> deserializer = new JsonDeserializer<>(Message.class);
        deserializer.setRemoveTypeHeaders(false);
        deserializer.addTrustedPackages("*");
        deserializer.setUseTypeMapperForKey(true);
        return new DefaultKafkaConsumerFactory<>(chatProducerFactory(), new StringDeserializer(), deserializer);
    }

    @Bean
    public ConcurrentKafkaListenerContainerFactory<String, Message> chatFactory() {
        ConcurrentKafkaListenerContainerFactory<String, Message> factory =
                new ConcurrentKafkaListenerContainerFactory<>();
        factory.setConsumerFactory(chatKafkaTemplate());
        return factory;
    }
}
As we’ve seen in the producer’s configuration, we need to specify the broker-server to connect to. What is important to note is the JsonDeserializer.
JsonDeserializer<Message> deserializer = new JsonDeserializer<>(Message.class);
        deserializer.setRemoveTypeHeaders(false);
        deserializer.addTrustedPackages("*");
        deserializer.setUseTypeMapperForKey(true);
As opposed to what we declared in the producer as a simple JsonSerializer, we will declare a Deserializer and some other configurations which I will explain now. Since the producer and the consumer exist in different applications when deserializing the JSON object to java object, Kafka will throw an error ‘ErrorHandlingDeserializer’, this is because the deserializer class does not trust the java object in the consumer. In other, to resolve this, we tell the serializer to trust all the packages (“*”), if we want to specify a particular package or object, we will just specify the package name like this:
deserializer.addTrustedPackages("com.example.consumer.model.Message");
Creating Consumer Service
Then, we create our service for the class to consume the message.
src/main/java/com/example/consumer/service/ConsumerService.java
@Service
public class ConsumerService {
private final Logger logger = LoggerFactory.getLogger(getClass());
private final List<Message> messages = new ArrayList<>();
@KafkaListener(topics = "chat", groupId = "chat-consumer", containerFactory = "chatFactory")
private void chatConsumer(Message message){
messages.add(message);
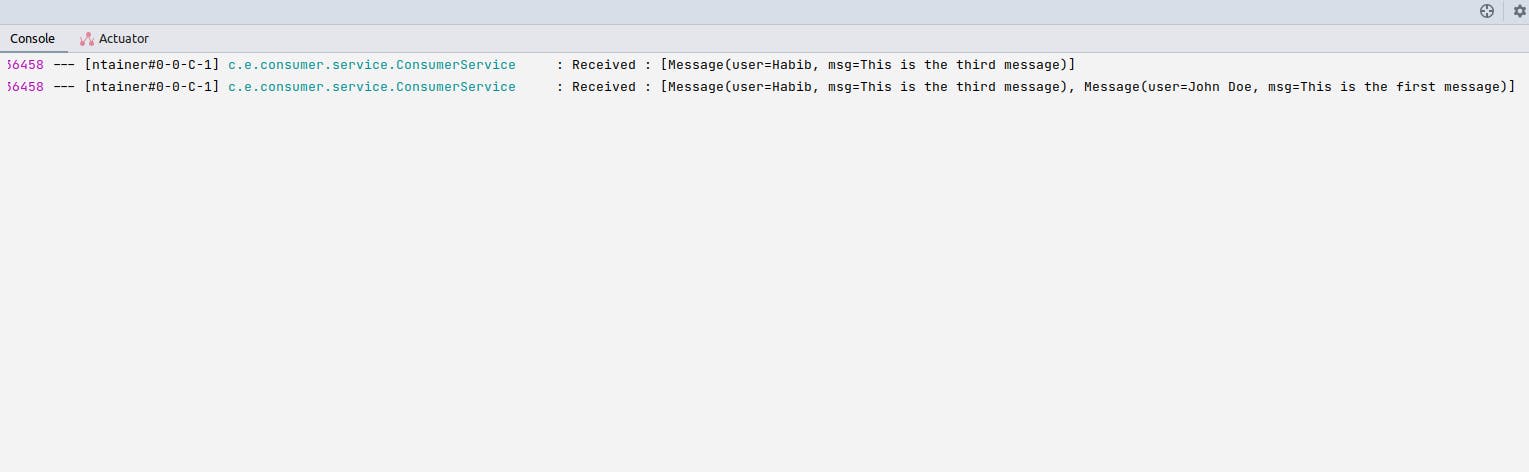
logger.info("Received : {}", messages);
}
}
Now, we can hit our producer endpoint again, to see the consumer pick up the messages from the topic.
How does a consumer know messages that have been read?
As mentioned earlier, each consumer in a consumer group reads exclusively from partitions; each message is identified by offset id. Whenever a consumer from a consumer group starts consuming messages from a particular topic, the offset id is committed to another topic __consumer_offsets internally by Kafka to note where the consumer is reading from. In the case of a failure, the consumer can resume consuming messages from where it left off.
Conclusion
In this tutorial, we learned about Kafka, some terminologies, and their uses. We also created a producer, configured it, and sent messages to a topic and created a consumer, configured it, and received/consumed messages pushed to the topic from the producer in real-time. Later, we discussed how a consumer remembers where it left off when it resumes from failure.
You can find the code used in this tutorial in this repo to follow along.